K, just to state this up front, I know very little about Unity. This tutorial is for people like me that just want to be able to show off there stuff in Real-time environment turntable. This tutorial requires the use of fbx files, so if you can’t make those, I don’t know how well this will work for you.
1. First, make sure you have unity. If not, it can be found at http://unity3d.com/
It is sizable and can be used to do much more than simple turntables, but that’s what I am using it for here.
2. Download this project zip and unrar it into your ‘documents’ folder, or wherever you want the project folder to live. By default unity looks in the ‘documents’ folder.
http://mattbeckman-3d.com/ffd/TurnTable.rar
The folder structure of the project should look like this:
Don’t worry, the only ones we need to work with for this tutorial is the ‘yourAsset’ Folder and the ones within.
3. Load up your choice of modeling program – and open your asset. Clean up the scene – get rid of any unnecessary nodes or hidden geometry.
4. Export the asset using the fbx file type option. When I exported, I use the Maya default options for exporting an fbx.
- export the file to the ‘yourasset’ folder
- this will export the mesh geometry and the materials, but not the texture maps.
- Manually move or copy your texture maps to the textures folder
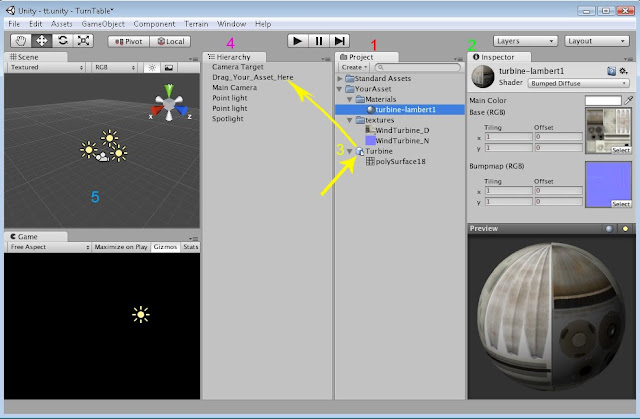
5. Load Unity and open project ‘turntable’. Unity will restart and load the scene file. Is should look something like this:
If not, go to Window > Layouts > 2 by 3. This way you can see what i am talking about while i explain.
Locate the Project tab (1) and look for yourasset folder. Expand this and you should see all of the textures, materials and mesh components that make up your asset.
6. Take the time to set up you materials - they work a little different that what you may be use to , but you should catch on pretty quick. Select the material you want to setup and look in the Inspector tab (2). you will see a the shader info and a preveiw.
-Clicking on the shader drop down tab will allow you to pcik what kind of shader material you want it to be. The one that work best for me is Diffuse Bumped, but play around and find one that works for you.
- Each shader type has different slot for texture maps. Click on the text map 'Select' box and select your texture map from the drop down menu.
7. Once you get all the texture applied to the appropriate shader materials, you can now look at the mesh Object and veiw it in the Inspector tab. Check to make sure the the textures and the shaders you used look right.
8. To place the Asset into the Turntable scene, simply drag the Object (3)(not the polymesh component) into the 'drag_you_asset_here' line in the Heirarchy tab(4). The object shold now be in the scene and viewable in the Game and scene tabs (5). You may have to scale your object up a bit in order to see it well.
9. Press the play button at the top center of Unity and test it by cliking and moving the mouse in the Game tab. Check to see that the orbit and zoom work. Check to make sure the object is centered on where the camera is focused. If it is not it can be fixed. - Before making any adjustment, unclick the play button.
- to fix the camera center of interest you can either adjust the 'camera target' to fit the object, or vice versa.
10. Once you are happy, you need to build the scene and test it out in the web browser. Do that by going to File > Build Settings... This will bring u pa dialog box:
Press the 'Add Current' button to add your scene to the build queue.
Select 'Web Player'
Click 'Build' to build the two files needed to put on your website.
Click 'build and run' to build the files and preveiw the turntable in a web browser.
The 2 files the the build creates are :
SCENE_NAME.html
SCENE_NAME.unity3d
Take the two file and upload them to you website! the .html file is the one that contains all the web page information and can be edited like any other .html (as far as i know) if you so choose. The .unity3d file is the file that contains the unity file information - the assets and turntable scene files.
That is pretty much it. Again, I know very little about unity, so if you know a better way, please let me know. And if anyone figures out how to do panning, also let me know.
Hopefully this is not too convoluted for people to follow...


